# config-client-enhance
对spring-cloud-config-client官方版本功能进行扩展,可从多个配置源加载配置,
并修改spring-cloud-bus的相关功能,实现批量刷新.
github链接:[config-client-enhance](https://github.com/fliaping/config-client-enhance)
## 简介
随着微服务改造的推进,每个服务的功能趋于专一,不过有些服务是从一个单体应用中拆分出来,
因此微服务之间有不少的共有配置,导致每个应用重复配置,当某个配置项发生改变时,
需要逐个修改,比较麻烦。最好的办法是将这些公共配置项抽取出来作为一个配置源,
但是官方的spring-cloud-config-client只能从单一配置源加载配置。因此在官方的基础上进行扩展,
通过config group的概念,可以将一个应用加入多个config group中,共用不同group的配置项。
再结合spring-cloud-bus,让每个服务能感知所加入的config group的改动,从而做到一处更改多处生效。
基于官方[spring-cloud-config-client](https://github.com/spring-cloud/spring-cloud-config),
通过spring-boot的autoconfig功能,覆盖配置源加载的方法,在兼容官方的配置前提下,
增加了一些配置项,使其能能从多个配置源加载配置。自动更新时客户端会收到远程的refresh消息,
并通过一个函数来确定是不是发给自己的,通过切面,修改这个判断函数,使多配置源的修改能及时更新到应用。
## 原理
### 官方spring-cloud-config的工作原理
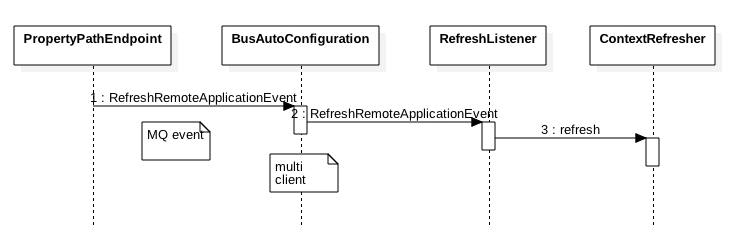
如下图,就是我们常用的结构,当然是比较简化的。

1. 当我们的配置发生变化之后,配置在git仓库的webhook用http的方式向ConfigServer发送refresh消息(或者自己手动触发)
2. ConfigServer再将这个消息发送给spring cloud bus(用kafka或者rabbitMQ实现)
3. 每个应用中有一个config-client,将会收到这个refresh消息
4. 如果destination和自己匹配,就执行刷新动作。 向config-server请求配置
5. config-server拉取配置仓库中的配置文件并转成相应的json格式
6. 回传给config-client,随后config-client将内容更新到上下文中。
那么我们增强的地方是哪里呢?其实都在config-client那里。先给出增强版的用法.
## 用法
### jar包
在项目根目录执行命令`gradle build`,在build/libs中可以找到jar包
如果在有私有的maven仓库,通过`gradle uploadArchives`将jar包上传到仓库,通过maven或者gradle坐标就可以引用
maven:
```xml
com.dianwoda.cloud.config
config-client-enhance
1.0-SNAPSHOT
```
gradle:
```groovy
compile 'com.dianwoda.cloud.config:config-client-enhance:1.0-SNAPSHOT'
```
### 配置文件
```
# config-client-enhance 新增配置
# 该配置组的名字,和spring.application.name作用相同,确定配置仓库
spring.cloud.config.group[0].name=sparta-web
# 该配置组的profile,和spring.cloud.config.profile作用相同,一般表示环境,确定仓库中的哪个文件
spring.cloud.config.group[0].profile=dwd-dev
# 该配置组的label,和spring.cloud.config.label作用相同,git仓库的分支
spring.cloud.config.group[0].label=master,RC
# 该配置组的其他文本配置,可以多个,半角逗号分开
spring.cloud.config.group[0].plainText=mm1.json,mm2.json
spring.cloud.config.group[1].name=sparta-dubbo
spring.cloud.config.group[1].profile=dwd-dev
# 主配置仓库中的纯文本配置
spring.cloud.config.plain-text=sms_template.json,push_fto.json,xx.json
# 忽略向ConfigServer发送refresh消息时,没有destination的情况(实际destination会变成通配符,匹配所有应用)
spring.cloud.bus.ignore-empty-dest=true
# 是否接受配置组发生的改变
spring.cloud.bus.accept-group-change=true
# config-client-enhance config 结束
# spring cloud config 官方版本配置
# 应用名(主仓库名)
spring.application.name=your application name
spring.cloud.consul.port=8500
#配置consul通过ip检查应用健康状态
spring.cloud.consul.discovery.prefer-ip-address=true
spring.cloud.consul.discovery.query-passing=true
#使用服务发现找到配置中心服务
spring.cloud.config.discovery.enabled=true
spring.cloud.config.discovery.serviceId=config-server
spring.cloud.config.fail-fast=true
health.config.enabled=false
#对应配置仓库的profile
spring.cloud.config.profile=dwd-dev
#对应配置仓库的分支
spring.cloud.config.label=master
#consul host 开发环境
spring.cloud.consul.host=192.168.11.29
# spring cloud bus 开关
spring.cloud.bus.enabled=true
#spring cloud bus kafka
spring.cloud.stream.kafka.binder.zk-nodes=192.168.11.30:2181,192.168.11.33:2181,192.168.11.35:2181
spring.cloud.stream.kafka.binder.brokers=192.168.11.30:9092,192.168.11.33:9092,192.168.11.35:9092
# # spring cloud config 官方版本配置结束
```
配置文件在完全兼容官方版本,但是额外增加一些配置,主要是config-group和refresh消息的控制。
group可以为多个,每个group有些配置项,基本和主配置一样,另外多加了plain-text是方便使用其他类型的纯文本配置,
下面给出示例:
```java
@Component
public class ConfigListener implements ApplicationListener {
@Override
public void onApplicationEvent(EnvironmentChangeEvent event) {
Set keys = event.getKeys();
if (keys.contains("xx.json")) {
System.out.println("根据xx.json重新配置");
}
}
}
```
## 详细实现
### 从多配置仓库加载配置
要想改造首先就要在代码水平清楚知道启动时如何加载远程服务器中的配置,我们从加了spring cloud的spring boot启动说起。
当执行了`SpringApplication.run(Application.class)`首先来到了这里,起个别名函数1
```java
// 函数1 SpringApplication
public ConfigurableApplicationContext run(String... args) {
StopWatch stopWatch = new StopWatch();
stopWatch.start();
ConfigurableApplicationContext context = null;
FailureAnalyzers analyzers = null;
configureHeadlessProperty();
SpringApplicationRunListeners listeners = getRunListeners(args);
listeners.starting();
try {
ApplicationArguments applicationArguments = new DefaultApplicationArguments(
args);
ConfigurableEnvironment environment = prepareEnvironment(listeners,
applicationArguments);
Banner printedBanner = printBanner(environment);
context = createApplicationContext();
analyzers = new FailureAnalyzers(context);
prepareContext(context, environment, listeners, applicationArguments,
printedBanner);
refreshContext(context);
afterRefresh(context, applicationArguments);
listeners.finished(context, null);
stopWatch.stop();
if (this.logStartupInfo) {
new StartupInfoLogger(this.mainApplicationClass)
.logStarted(getApplicationLog(), stopWatch);
}
return context;
}
catch (Throwable ex) {
handleRunFailure(context, listeners, analyzers, ex);
throw new IllegalStateException(ex);
}
}
```
在这个函数中,嵌入spring cloud的程序和没有嵌入的行为有些差异,尤其是当我们调试的时候,我们会发现
程序进入`ConfigurableEnvironment environment = prepareEnvironment(listeners, applicationArguments);`(函数2)
这一行后又重新进入这个函数(普通的SpringBoot程序只会调用该函数一次),再看下进程,还是主进程,
于是通过IDEA强大的代码索引能力,我们发现`SpringApplicationBuilder`的
`public ConfigurableApplicationContext run(String... args)`这个函数(函数3)中有调用函数1,通过不断调试追踪,函数3是被
`BootstrapApplicationListener`调用,这个Listener监听`ApplicationEnvironmentPreparedEvent`事件。
可见在此期间肯定产生了这个事件,但是这个Listener是如何注册被调用的?我们再回到函数2:prepareEnvironment,
```java
// 函数2 SpringApplication
private ConfigurableEnvironment prepareEnvironment(
SpringApplicationRunListeners listeners,
ApplicationArguments applicationArguments) {
// Create and configure the environment
ConfigurableEnvironment environment = getOrCreateEnvironment();
configureEnvironment(environment, applicationArguments.getSourceArgs());
listeners.environmentPrepared(environment);
if (!this.webEnvironment) {
environment = new EnvironmentConverter(getClassLoader())
.convertToStandardEnvironmentIfNecessary(environment);
}
return environment;
}
```
可以看到有个继承自`SpringApplicationRunListener`的listener集合,通过找哪个地方用到这个类,
在一个spring.factories(后续再说这个)中发现了`EventPublishingRunListener`,这个类的`environmentPrepared`
方法广播了`ApplicationEnvironmentPreparedEvent`,因此BootstrapApplicationListener监听到事件之后执行后续动作。
这里会有一个疑问,这些listener是如何加载到的,其实就是前面说的`spring.factories`,函数1中`getRunListeners(args)`
就是去加载listener,通过`SpringFactoriesLoader`加载这个配置文件`META-INF/spring.factories`,并解析出其中的类进行加载
,其实这个配置文件很有用,后面还会用到。
继续前面的内容,BootstrapApplicationListener重新调用函数1,目的是为了插入一些spring cloud相关初始化需要的环境,
这里的细节就不表了,主要应该是一些相关的配置类。我们关心的如何将远程配置加载到spring中。通过调试,找到了`PropertySourceBootstrapConfiguration`,
可见这是一个取代了原来spring boot中的PropertySource配置的配置类,其中有个initialize函数,我们可以一窥究竟。
```java
// 函数4 BootstrapApplicationListener
@Override
public void initialize(ConfigurableApplicationContext applicationContext) {
CompositePropertySource composite = new CompositePropertySource(
BOOTSTRAP_PROPERTY_SOURCE_NAME);
AnnotationAwareOrderComparator.sort(this.propertySourceLocators);
boolean empty = true;
ConfigurableEnvironment environment = applicationContext.getEnvironment();
for (PropertySourceLocator locator : this.propertySourceLocators) {
PropertySource source = null;
source = locator.locate(environment);
if (source == null) {
continue;
}
logger.info("Located property source: " + source);
composite.addPropertySource(source);
empty = false;
}
if (!empty) {
MutablePropertySources propertySources = environment.getPropertySources();
String logConfig = environment.resolvePlaceholders("${logging.config:}");
LogFile logFile = LogFile.get(environment);
if (propertySources.contains(BOOTSTRAP_PROPERTY_SOURCE_NAME)) {
propertySources.remove(BOOTSTRAP_PROPERTY_SOURCE_NAME);
}
insertPropertySources(propertySources, composite);
reinitializeLoggingSystem(environment, logConfig, logFile);
setLogLevels(environment);
handleIncludedProfiles(environment);
}
}
```
这里引入了`propertySourceLocator`看名字就知道用他们来取得propertySource,并且可以有很多个Locator,
最后加入到`CompositePropertySource`(组合PropertySource),再来看看有那些`PropertySourceLocator`,
一下子就发现了`ConfigServicePropertySourceLocator`,这应该就是从configServer中获取配置的地方。
果不其然。
```java
@Override
@Retryable(interceptor = "configServerRetryInterceptor")
public org.springframework.core.env.PropertySource locate(
org.springframework.core.env.Environment environment) {
ConfigClientProperties properties = this.defaultProperties.override(environment);
CompositePropertySource composite = new CompositePropertySource("configService");
RestTemplate restTemplate = this.restTemplate == null ? getSecureRestTemplate(properties)
: this.restTemplate;
...
try {
...
// Try all the labels until one works
for (String label : labels) {
Environment result = getRemoteEnvironment(restTemplate,
properties, label.trim(), state);
if (result != null) {
...
if (result.getPropertySources() != null) { // result.getPropertySources() can be null if using xml
for (PropertySource source : result.getpro()) {
@SuppressWarnings("unchecked")
Map map = (Map) source
.getSource();
composite.addPropertySource(new MapPropertySource(source
.getName(), map));
}
}
...
return composite;
}
}
}
...
}
```
通过RestTemplate向configServer发送http请求获取配置,将获取到的PropertySources组装成env的PropertySource后返回,
更加详细的获取过程就在函数`getRemoteEnvironment(restTemplate, properties, label.trim(), state);`
这里不细说。那么如果我们想扩展配置的获取方式,可以新增加一个像`ConfigServicePropertySourceLocator`的locator,
那么我最后确实是这么做的。先找到配置`ConfigServicePropertySourceLocator`的类`ConfigServiceBootstrapConfiguration`
我扩展了config的功能,于是叫`ExtendConfigServiceBootstrapConfiguration`,那获取配置的locator就叫`ExtendConfigServicePropertySourceLocator`,
当然也需要些额外的配置项`ExtendConfigClientProperties`。最后为了能加载这些配置类,加了`spring.factories`
```
# Bootstrap components
org.springframework.cloud.bootstrap.BootstrapConfiguration=\
com.dianwoda.cloud.config.client.ExtendConfigServiceBootstrapConfiguration
```
### 批量刷新共有配置
spring cloud config在刷新的时候有点不爽的地方,当没有destination的时候会configServer会转成`*:**`,这是对所有应用生效,
另外如果想对某一类应用更新的话destination规则比较死板,虽然支持通配符的destination,但是如果我想对不同名字的应用,
但是使用了同一个共有配置仓库的应用更新的话就没有办法,于是就在对官方的bus下手进行魔改,当然前提也是要搞清楚是怎么回事才能改。
利用spring-cloud-starter-stream-kafka的整合,利用注解,将kafka消息转化为`RemoteApplicationEvent`
```java
@StreamListener(SpringCloudBusClient.INPUT)
public void acceptRemote(RemoteApplicationEvent event) {
if (event instanceof AckRemoteApplicationEvent) {
if (this.bus.getTrace().isEnabled() && !this.serviceMatcher.isFromSelf(event)
&& this.applicationEventPublisher != null) {
this.applicationEventPublisher.publishEvent(event);
}
// If it's an ACK we are finished processing at this point
return;
}
if (this.serviceMatcher.isForSelf(event)
&& this.applicationEventPublisher != null) {
if (!this.serviceMatcher.isFromSelf(event)) {
this.applicationEventPublisher.publishEvent(event);
}
if (this.bus.getAck().isEnabled()) {
AckRemoteApplicationEvent ack = new AckRemoteApplicationEvent(this,
this.serviceMatcher.getServiceId(),
this.bus.getAck().getDestinationService(),
event.getDestinationService(), event.getId(), event.getClass());
this.cloudBusOutboundChannel
.send(MessageBuilder.withPayload(ack).build());
this.applicationEventPublisher.publishEvent(ack);
}
}
if (this.bus.getTrace().isEnabled() && this.applicationEventPublisher != null) {
// We are set to register sent events so publish it for local consumption,
// irrespective of the origin
this.applicationEventPublisher.publishEvent(new SentApplicationEvent(this,
event.getOriginService(), event.getDestinationService(),
event.getId(), event.getClass()));
}
}
```
通过ServiceMatcher来判断是不是给自己的消息,是的话就发布出去,触发后续流程,不是的话直接ack,
利用这一点,用切面覆盖了isForSelf函数,最后就可以由自己控制何种情况下接受,何种情况下拒绝。